


Tutorial for a Cellphone Wallet

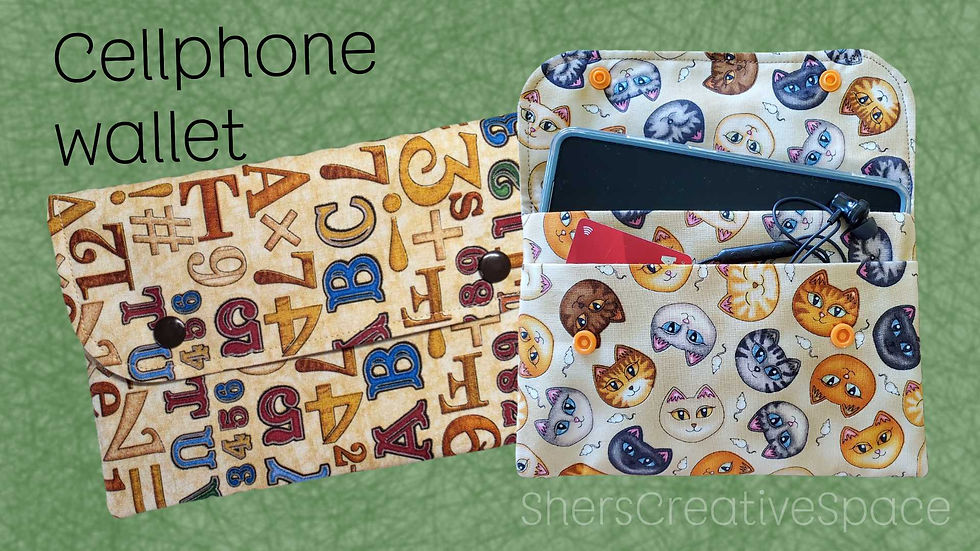
A quick project to make for holding your cellphone or anything else you might need. It also has a second pocket for some money, cards, earbuds, anything you’ll want to take with you. You can even add a tab or wrist strap. It holds my phone (Samsung S26 Ultra inside its case) with room to spare. If your phone is larger, you can easily adjust the wallet width by an inch or two to fit your phone. The completed wallet measures 7 3/4 x 5 inches.
For one cellphone wallet you’ll need:
100% cotton fabric measuring 8 1/2 by 36 inches
Medium weight fusible interfacing measuring 8 x 35 1/2 inches
2 sets of Kam-snaps or other snap brand (you can even use Velcro, buttons, or sew-in snaps)
Thread to match fabric
A non-directional fabric must be used so nothing will be upside down after turning.
Important tips & general instructions:
**Read tips and instructions thoroughly before beginning.
**Presser Foot: Use a presser foot with a clear center to maintain clear visibility when steering along marked curves.
**Needle Position: Set the sewing machine to stop with the needle in the down position so the fabric doesn’t shift when lifting the presser foot at corners. If you don’t have this setting on your machine, just manually turn the wheel so that the needle is in the down position before turning or pivoting your fabric.
Instructions:
1. After your fabric and interfacing have been cut to the needed dimensions, fuse the interfacing to the backside of your fabric. Be sure to follow the instructions for the brand of interfacing you are using.
2. Make line markings at 1/4 inch, 10 inches, and 18 inches. The 1/4 inch will be the seam allowance. Draw the lines measuring from the edge, not the 1/4-inch line you drew first.
You will be using at 1/4-inch seam allowance for the construction of the wallet.

3. Fold right sides together along the 10-inch line and iron, then repeat for the 18-inch line. Open the fabric back up and bring the 10-inch fold to meet the 1/4-inch seam line, making sure not to overlap or cover the line. Bring the final 18-inch fold to the exact same 1/4-inch line, creating two aligned folds, and give them a quick press.

4. Flip the piece over, fold it in half so raw edges meet, line up all edges, and pin or clip to secure.

5. Mark 1/4-inch stitching lines along the side edges and the along the folded edge on the flap. You can leave the flap as is so it will have 90° corners, or you can round them using a special tool (like shown in the images) or you can use a candle cup, thread spool, anything round will work fine. Just place it so it touches each line at the corners and trace.
6. Go to the machine and stitch precisely on these drawn lines. It’s important to leave the bottom edge completely open for turning. Backstitch at the start and finish of every seam to prevent unraveling.
7. Trim seam allowances to about 1/8-inch away from the seams. I wouldn’t cut any closer than that. Clip corners. If you made a rounded corner, you could clip or notch close to the seam to lessen the bulk.

8. Turn the bag right side out through the flap opening to expose the pockets, push out the corners, and press the flap. When you open the bottom and look inside, you’ll see where the two right sides are facing each other, that’s where you’ll do your turning. Give the flap a quick press.

9. Stitch across the bottom closing it up. You’ll stitch 1/4-inch from the raw edge. Try not to catch the folds in your line of stitching. Trim about 1/8-inch away from the seam.

10. Turn the piece right side out to completely reveal the second pocket and the larger main pocket. Push out corners and give the whole piece a full press.
11. Topstitch about 1/8 inch away from the edge along the flap perimeter only.

12. Fold the flap in half meeting the corners. Decide where you want your snaps. Mine are about 1 1/2-inches away from the sides and about an inch from the bottom of the flap. Make markings on each side where you want your snaps. I’m using Kamsnaps so I used the awl that comes with it and poke it through all layers so they will be evenly placed when the flap is closed. If you are using another brand, follow the manufacturer’s instructions for the brand you are using.
13. Install the snap caps with the smooth side facing the outside of the flap. I used the “male” portion for inside of the flap. Fold the flap down and press firmly to create indentations on the pocket body, mark where you want the holes, with a pen. If your fabric type doesn’t give a good indentation, you can line up the flap where you want it and mark where the other part of the snaps will go.
14. Puncture the pocket at the marks, installing the mating snap halves through only one layer of the pocket with the smooth caps on the inside of the pocket.

Don't miss any free tutorials, articles, sewing tips ane more!
Sign up for Sher's Creative News


Comments